REVIEW · DUBLIN
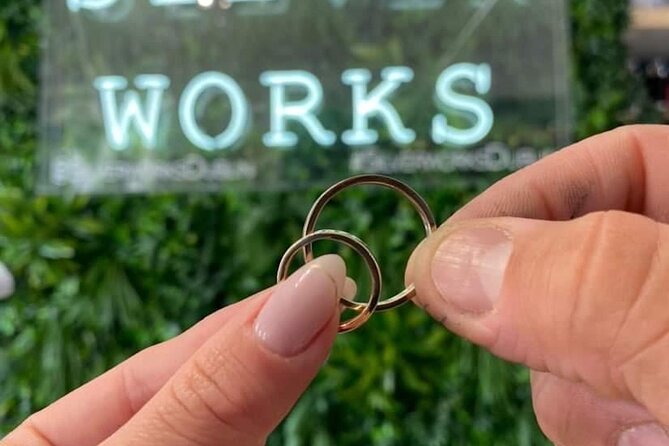
Dublin Jewellery Forge a Hammered Silver ring:Georges Street
Book on Viator →Operated by Silver Works · Bookable on Viator
A ring-making class beats another museum stop. In Dublin’s Georges Street silver studio, you forge a sterling silver hammered ring and choose your own texture and curve. It’s hands-on, shop-floor real, and you get a souvenir that actually means something.
Two things I really like: first, the workshop runs like a guided build, with a professional soldering demonstration and clear explanations as the work moves forward. Second, you’re not stuck with one look. You shape the curve, pick one of several textures, and decide how shiny you want the finish.
One drawback to plan around: the studio is in old buildings with stairs and no lift, and late arrivals over 10 minutes aren’t admitted. So if mobility is an issue or you’re the kind of person who runs late, this one needs a little extra buffer.
In This Review
- Key points before you go
- Entering Silver Works on Great George’s Street
- The 2-hour flow: from silver strip to your final ring
- 1) Measure, mark, and cut to length
- 2) Form the ring with a mallet and ring mandrel
- 3) Watch soldering in front of you, with expert explanations
- 4) File it smooth and set the curve
- Hammered texture choices that make your ring look Irish
- Polish choice: rustic inside-only or full sparkle
- Why the coffee, tea, and chocolate matter more than you think
- Price and value: what $103.79 buys you in Dublin
- Who should book this hammered silver ring workshop
- Age fit and family reality check
- Getting ready: timing, tools, and small practical surprises
- Plan to arrive early
- The studio is small, and there’s no luggage storage
- Bring your expectations about accessibility
- Transportation is easy, but check your route
- What language?
- Should you book the Dublin hammered silver ring class?
- FAQ
- How long is the Dublin hammered silver ring workshop?
- Is prior silversmithing experience required?
- What can I customize for my ring?
- What do I get to take home?
- Is the workshop suitable for children?
- Is the studio wheelchair accessible?
Key points before you go
- Live soldering demo with step-by-step explanations so you know what’s happening (and why)
- Shape control: you set the ring curve and dial in how it will sit on your finger
- Hammered texture choices using a planishing hammer for a truly personal look
- Inside vs full polish option for either a rustic feel or extra sparkle
- Small groups up to 12 with lots of time to ask questions and get guidance
- Coffee, tea, and plenty of chocolate to keep the workshop mood warm
Entering Silver Works on Great George’s Street
This is the kind of class that feels like a working craft shop, not a stage show. The address is on South Great George’s Street (Dublin 2), in a studio inside two old period buildings. It’s a classic Dublin setup: charming on the outside, with plenty of stairs once you’re inside.
That matters for two reasons. First, you’ll want comfortable shoes because you’re moving around in a compact space. Second, it’s not wheelchair accessible and there’s no lift, so plan accordingly if you need step-free access.
What you get right away is a clear sense of “you’re making something real.” The instructor sets the pace, but the process stays hands-on. You’ll mark, cut, shape, file, texture, and finish a silver ring that you keep.
You can also read our reviews of more tours and experiences in Dublin.


The 2-hour flow: from silver strip to your final ring
The workshop is roughly 2 hours, and it’s structured like a build sequence. You start by deciding what finger the ring is for, then you mark the silver to the right length. That finger choice isn’t just a nice touch. It’s how the ring ends up fitting your actual plan, not some guess.
Here’s the rhythm you should expect:
1) Measure, mark, and cut to length
You’ll begin by marking your silver strip to the length you need. Then you use a handsaw to cut it. This step is oddly satisfying. It’s also where you realize how beginner-friendly the class is, because the instructor walks you through what to do and where to be careful.
2) Form the ring with a mallet and ring mandrel
Next comes shaping. You’ll form the ring by shaping the metal onto a ring mandrel using a mallet. This is the moment where the ring stops being a flat strip and becomes an actual circle you can picture wearing.
3) Watch soldering in front of you, with expert explanations
Then the class shifts into a key craft skill: joining the ends with soldering. You watch as the expert tutor performs the soldering in front of you, and she explains what she’s doing as she goes. Even if you don’t get solder in your hands during this moment, the explanation helps you understand how a silversmith “closes the loop” and creates a secure band.
This live demo format is one of the best parts of the experience. You’re not guessing. You’re learning the logic behind the craft.


4) File it smooth and set the curve
After soldering, you’ll move into filing using different hand files. This is where the ring starts to feel “real-world ready.” Filing also gives you a chance to shape the comfort.
You’ll individualize the ring curve here. Changing the curve is a small design choice with a big effect on how the ring feels when you put it on. It also helps your ring look less generic and more like something you made on purpose.
Hammered texture choices that make your ring look Irish
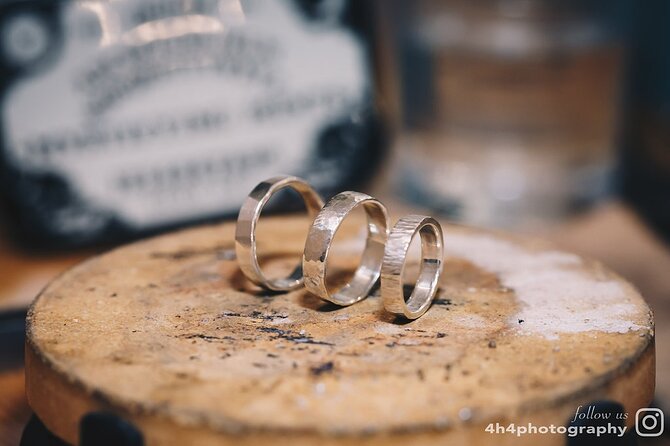
Once the base ring is shaped and cleaned up, the workshop moves into the part people tend to remember most: texture.
You’ll choose from three different textures, then use a planishing hammer to achieve the finish you selected. The planishing hammer is the tool that creates controlled dents and waves—so your ring gets that hammered, handcrafted character instead of looking like store-bought jewelry.
This is also where your ring becomes unmistakably yours. Even with the same texture option, your pressure and rhythm can influence the final look. That’s why this class works so well as a souvenir: it’s personal without needing any artistic background.
Polish choice: rustic inside-only or full sparkle
Finally, you’ll choose your polish style. The options are:
- Polished only on the inside, which gives a more artistic or rustic look
- Fully polished, for that cleaner, glossier sparkle
This is a smart choice point because it affects the ring’s vibe. Inside polishing helps comfort, but outside polishing changes how “flashy” the ring looks under light.
When you leave, you’re not taking home a bottle of perfume or a generic keychain. You’re wearing proof you made something with your own hands.
Why the coffee, tea, and chocolate matter more than you think

Yes, the complimentary coffee or tea and lots of chocolate are a nice perk. But in a short, hands-on class, they do more than sweeten the mood.
When you’re doing fine, repetitive work (sawing, filing, shaping), your focus matters. A quick break with chocolate helps reset your hands and your attention. It also keeps the class from feeling like a rushed workshop where everyone’s trying to finish fast.
The other piece is group size. The class maxes out at 12 travelers, so it stays intimate. You’re watching and working without feeling lost in a crowd. That size also supports real questions during the process.
Price and value: what $103.79 buys you in Dublin
At $103.79 per person, this isn’t a bargain “do-it-in-20-minutes” craft. It’s closer to paying for instruction, tools, and materials, plus the value of walking out with a wearable piece of sterling silver.
Here’s what you’re actually getting included:
- Sterling silver for your ring
- Coffee and/or tea
- Lots of chocolate
So you’re paying for the full build experience. You’re not just stamping a charm—you’re making a functional ring that’s cut, shaped, joined, filed, textured, and finished.
And because you control the curve and texture, the ring you leave with isn’t a one-size design. It’s tailored to your finger and your taste. For me, that’s the real value: you’re buying a lesson that ends with an item you’ll keep.
Who should book this hammered silver ring workshop
This is a good match if you want an active, creative activity and you’d rather make something than just look at things.
It’s especially appealing if:
- You want a rainy-day plan in Dublin that doesn’t feel like sightseeing fatigue
- You like hands-on work with clear steps
- You want a meaningful Irish souvenir that isn’t mass-produced
- You’re traveling with someone and want something you both do together
It can also be a solid confidence-builder. The process is taught step by step, and the style of instruction is geared toward helping you get to a finish you’ll feel proud of. You’ll see instructors working carefully with different people, including those who feel unsure about their hands.
Instructors you may encounter include names like Emily, Trisha, and Cat, and there’s been praise for teaching that stays patient and supportive.
Age fit and family reality check
There’s an important boundary: no children under 10. Kids under 16 need to be accompanied by a paying adult.
If your group includes younger kids, you’ll want to look for another activity. This one is hands-on in a way that requires attention and maturity.
Getting ready: timing, tools, and small practical surprises
A few details can make or break the experience, mainly because the studio is in a tight space and the class starts on time.
Plan to arrive early
If you arrive more than 10 minutes late, you won’t be permitted entry to the workshop, and you won’t be entitled to a refund or reschedule. That’s strict, so build in buffer time, especially if you’re finding the address for the first time.
The studio is small, and there’s no luggage storage
The studio space is small, and they can’t offer luggage storage. If you’re arriving in Dublin with a big bag, travel light. Bring what you need for 2 hours, not your whole suitcase.
Bring your expectations about accessibility
Again: the buildings have plenty of stairs and no lift. It’s not wheelchair accessible. If you use mobility aids or need step-free routes, this may be uncomfortable.
Transportation is easy, but check your route
It’s near public transportation, which is helpful. Still, the real trick is finding the right entrance and building. Make sure you use the exact location listed when you book.
What language?
The workshop is offered in English, and that’s good if you’re traveling from places where English is workable for you.
Should you book the Dublin hammered silver ring class?
Book it if you want a hands-on Dublin experience with a result you can wear immediately. The combination of live soldering instruction, real metalwork steps, and customization (curve, texture, and polish) makes it a smart use of time—especially on a cloudy day when you still want something memorable.
Skip it if stairs are a serious issue for your group, or if you’re likely to arrive late. Also skip it if you only want passive sightseeing. This is work in the best way: you’ll use your hands, make choices, and leave with a sterling silver ring you built yourself.
FAQ
How long is the Dublin hammered silver ring workshop?
The workshop runs for about 2 hours.
Is prior silversmithing experience required?
No prior experience is needed. The process is taught step by step, and you’ll also watch a soldering demonstration with explanations.
What can I customize for my ring?
You choose the finger size at the start, shape the curve, select one of three textures using a planishing hammer, and pick either inside-only polishing or full polishing.
What do I get to take home?
You keep the handmade sterling silver ring you make during the workshop.
Is the workshop suitable for children?
No children under 10 are allowed. Children under 16 must be accompanied by a paying adult.
Is the studio wheelchair accessible?
No. The studio is in old period buildings with plenty of stairs and no lift, so it is not wheelchair accessible. Service animals are allowed.